Category: Magento Coding


In this post I will show you how to write a basic magento model to do AMD activities to a db table.

Under package “Mypackage” & module “Mymod” we will create model Test so that we can do AMD with table named “test”.

1.Here we first create a table test in db.

CREATE TABLE `test` (
`test_id` INT NOT NULL AUTO_INCREMENT PRIMARY KEY ,
`name` VARCHAR( 25 ) NOT NULL
) ENGINE = MYISAM 

2.Create shell module Mymod under package Mypackage

//file:- /app/etc/modules/Mypackage_Mymod.xml

<?xml version="1.0"?>
<config>
    <modules>
        <Mypackage_Mymod>
            <active>true</active>
            <codePool>local</codePool>
        </Mypackage_Mymod>
    </modules>
</config> 

3.Write config.xml for Mymod module. Here we declate a handler for table test .
//file:-/app/code/local/Mypackage/Mymod/etc/config.xml

/
<?xml version="1.0"?>
<config>
    <modules>
        <Mypackage_Mymod>
            <version>0.1.0</version>
        </Mypackage_Mymod>
    </modules>
    <global>
        <models>
			<mymod>
				<!-- Init model for mymod module -->
				<class>Mypackage_Mymod_Model</class>
				<!-- Init db config handler for mymod models -->
				<resourceModel>mymod_mysql4</resourceModel>
			</mymod>
			
			<!-- declaring model vs db table relation -->
            <mymod_mysql4>
                <class>Mypackage_Mymod_Model_Mysql4</class>
				<!-- declate table test -->
                <entities>
                    <test>
                        <table>test</table>
                    </test>
                </entities>
				<!-- -/- -->
            </mymod_mysql4>
			<!-- -/- -->
        </models>
		
		
		<!-- Setup db read & write connection for Mymod module -->
		<resources>
			<!-- db write connection -->
			<mymod_write>
				<connection>
					<use>core_write</use>
				</connection>
			</mymod_write>
			<!-- db read connection -->
			<mymod_read>
				<connection>
					<use>core_read</use>
				</connection>
			</mymod_read>
		</resources>
		<!-- -/- -->
    </global>
</config>

4.Write model Test.php. Here we configure this model with the handler of table test.
file:-/app/code/local/Mypackage/Mymod/model/Test.php

<?php

class Mypackage_Mymod_Model_Test extends Mage_Core_Model_Abstract
{
	
	public function _construct()
    {
        parent::_construct();
        $this->_init('mymod/test');
    }
}

5.Create the resource model for model test.
file:-/app/code/local/Mypackage/Mymod/model/Mysql4/Test.php. here we also configure the primary key id of the table test.

<?php

class Mypackage_Mymod_Model_Mysql4_Test extends Mage_Core_Model_Mysql4_Abstract
{
    public function _construct()
    {    
        $this->_init('mymod/test', 'test_id');
    }
}

6.Create a collection class so that we can retrive data from table test.
file:-/local/Mypackage/Mymod/model/Mysql4/Test/Collection.php

<?php

class Mypackage_Mymod_Model_Mysql4_Test_Collection extends Mage_Core_Model_Mysql4_Collection_Abstract
{
    public function _construct()
    {
        parent::_construct();
        $this->_init('Mymod/test');
    }
}

That’s it we are done. Now we can do AMD operation with table test with model test.

	$model = Mage::getModel('mymod/test')
		->setName('Asad Rahman')
		->save();

Also use the test collection model to retrive collection data from table test.

	$model = Mage::getModel('mymod/test')
	$data = $model->getCollection()->getData();
	print_r($data);

Here is a code snippet exaple how you fetch all products by it’s attribute set name:-

//Fetch attribute set id by attribute set name
$attrSetName = 'my_custom_attribute';
$attributeSetId = Mage::getModel('eav/entity_attribute_set')
	->load($attrSetName, 'attribute_set_name')
	->getAttributeSetId();

//Load product model collecttion filtered by attribute set id
$products = Mage::getModel('catalog/product')
	->getCollection()
	->addAttributeToSelect('name')
	->addFieldToFilter('attribute_set_id', $attributeSetId);

//process your product collection as per your bussiness logic
$productsName = array();
foreach($products as $p){
	$productsName[] = $p->getData('name');
}
//return all products name with attribute set 'my_custom_attribute'
print_r($productsName); 

That’s it, have happy time with magento 🙂 !!!

How long customer is inactive ?

$customer = Mage::getSingleton('customer/session')->getCustomer();
$log = Mage::getModel('log/customer')->load($customer->getId());
$inctive_time = now() - $log->getLastVisitAt();

Here I come to know about an awesome feature of Magento. When we add any eav attribute to an entity we can give a backend model name. Whenever Entity will be loaded magento initiates Mage_Eav_Model_Entity_Attribute model for each attribut. If it finds any backend model name for a eav attribut, it loads the corresponding model and based on what it is doing it will call different method from that model.

Here I am giving a complete example how you can use this feature. We will add an attribue to address model as “address_verified” , use a backend model to set this value whenever the any address will be save.

Step 1.Create a custom model “Mymodule”

Step 2.Write an sql setup for this module. It will add an “address_verified” attribute to address entity

<?php $installer = $this; $installer->startSetup();

$installer->run("
INSERT INTO {$this->getTable('eav_attribute')}  (
`entity_type_id` ,
`attribute_code` ,
`attribute_model` ,
`backend_model` ,
`backend_type` ,
`backend_table` ,
`frontend_model` ,
`frontend_input` ,
`frontend_input_renderer` ,
`frontend_label` ,
`frontend_class` ,
`source_model` ,
`is_global` ,
`is_visible` ,
`is_required` ,
`is_user_defined` ,
`default_value` ,
`is_searchable` ,
`is_filterable` ,
`is_comparable` ,
`is_visible_on_front` ,
`is_html_allowed_on_front` ,
`is_unique` ,
`is_used_for_price_rules` ,
`is_filterable_in_search` ,
`used_in_product_listing` ,
`used_for_sort_by` ,
`is_configurable` ,
`apply_to` ,
`position` ,
`note` ,
`is_visible_in_advanced_search`
)
VALUES (
'2', 'is_validated', NULL , 'customer_entity/address_attribute_backend_validate', 'int', NULL , NULL , 'text', NULL , NULL , NULL , NULL , '1', '1', '0', '0', NULL , '0', '0', '0', '0', '0', '0', '0', '0', '0', '0', '1', '', '', '', '0'
);

");

$installer->endSetup(); 

Step3.Write the back end model in your local code pool


<?php 

class Mypackage_Customer_Model_Entity_Address_Attribute_Backend_Validate
	extends Mage_Eav_Model_Entity_Attribute_Backend_Abstract
{
	public function beforeSave($object)
	{
		//Write your code to validate address
		$object->setIsValidated($satoriStatus);
		return $this;
    }
}

Step 4. Override the backend model so that it runs from your local pool

</config>
 <models>
 <customer_entity>
 <rewrite>
 <address_attribute_backend_satori>Mypackage_Customer_Model_Entity_Address_Attribute_Backend_Satori</address_attribute_backend_satori>
 </rewrite>
 </customer_entity>
 </models>
<config>

Magento has an awesome way to manage configuration values. Under Admin>System>Configuration all useful configuration for different module resides. Today I am going to show you how to create a new configuration value in admin and how use them from your code.

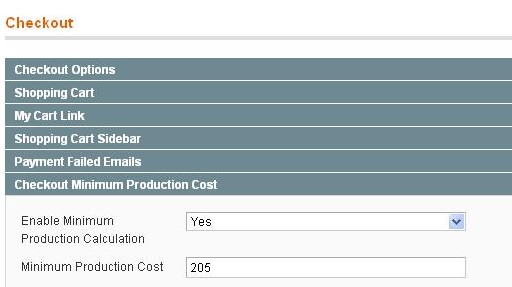
For example Lets create 2 fields under configuration, Enable Minimum Production Calculation , a drop down with Yes/No value and another a text input field Minimum Production Cost

Step 1: 

Set path for your configuration field in \app\code\local\Mypackage\Mymodule\etc\Config.xml by create a default node under config.


<?xml version="1.0"?>
<config>

    <modules>
        <Mypackage_Mymodule>
            <version>0.3.0</version>
        </Mypackage_Mymodule>
    </modules>

	<global>

        <models>
            <mymodule>
                <class>Mypackage_Mymodule_Model</class>
                <resourceModel>mymodule_mysql4</resourceModel>
            </mymodule>
            <mymodule_mysql4>
                <class>Mypackage_Mymodule_Model_Mysql4</class>
                <entities>
                    <mymodule>
                        <table>mytablename</table>
                    </mymodule>
                </entities>
            </mymodule_mysql4>
        </models>

        <resources>
            <mymodule_setup>
                <setup>
                    <module>Mypackage_Mymodule</module>
                </setup>
                <connection>
                    <use>core_setup</use>
                </connection>
            </mymodule_setup>
            <mymodule_write>
                <connection>
                    <use>core_write</use>
                </connection>
            </mymodule_write>
            <mymodule_read>
                <connection>
                    <use>core_read</use>
                </connection>
            </mymodule_read>
        </resources>

	    <helpers>
            <mymodule>
                <class>Mypackage_Mymodule_Helper</class>
            </mymodule>
        </helpers>

    </global>
	<!-- Create we create config path for cofiguration -->

	<default>
		<!-- Under checkout/mimimumproduction we create out config paths and their default values -->
		<checkout>
			<minimumproduction>
				<!-- Config path checkout/mimimumproduction/minimum_production_enabled with defaule value 1 -->
				<minimum_production_enabled>1</minimum_production_enabled>
				<!-- Config path checkout/mimimumproduction/minimum_production_cost with defaule value 200 -->
				<minimum_production_cost>200</minimum_production_cost>

			</minimumproduction>
		</checkout>
	</default>
</config>

That’s it, now can from your code you can access this config values using Mage::getStoreConfigFlag() and Mage::getStoreConfig like following:-

//return true false based on config settings
Mage::getStoreConfigFlag('checkout/minimumproduction /minimum_production_enabled');
//return 200
Mage::getStoreConfig('checkout/minimumproduction/minimum_production_cost');

But still you are not done.Customer not gonna change these values from XML. You need to give your client a way to set these values from admin panel. So, lets make our hands dirty on admin panel changing 🙂

Step 2:-

Create your configuraion alias node under \app\code\local\Mypackage\Mymodule\etc\system.xml

<?xml version="1.0"?>

<config>
    <sections>
        <checkout translate="label" module="checkout">

			<!-- If want to set these config values under youw own module, only then change the following commented fields -->
			<!--
            <label>Checkout</label>
            <tab>sales</tab>
            <frontend_type>text</frontend_type>
            <sort_order>305</sort_order>
            <show_in_default>1</show_in_default>
            <show_in_website>1</show_in_website>
            <show_in_store>0</show_in_store> -->

            <groups>

				<!-- Create a field group for your config paths -->
                <minimumproduction translate="label">
                    <label>Checkout Minimum Production Cost</label>
                    <frontend_type>text</frontend_type>
                    <sort_order>500</sort_order>
                    <show_in_default>1</show_in_default>
                    <show_in_website>1</show_in_website>
                    <show_in_store>1</show_in_store>

					<!-- List your config values here -->
                    <fields>

						<!-- This goes for checkout/minimumproduction/minimum_production_enabled -->
						<minimum_production_enabled translate="label">
                            <label>Enable Minimum Production Calculation</label>
                            <frontend_type>select</frontend_type>
                            <source_model>adminhtml/system_config_source_yesno</source_model>
                            <sort_order>1</sort_order>
                            <show_in_default>1</show_in_default>
                            <show_in_website>1</show_in_website>
                            <show_in_store>1</show_in_store>
                        </minimum_production_enabled>

						<!-- This goes for checkout/minimumproduction/minimum_production_cost -->
						<minimum_production_cost translate="label">
                            <label>Minimum Production Cost</label>
                            <frontend_type>text</frontend_type>
                            <sort_order>2</sort_order>
                            <show_in_default>1</show_in_default>
                            <show_in_website>1</show_in_website>
                            <show_in_store>1</show_in_store>
                        </minimum_production_cost>

                    </fields>

                </minimumproduction>

            </groups>

        </checkout>

    </sections>

</config><!--more-->

Ya, now you are done. If you go to Admin>System>Configuration you can see a new field group with name Checkout Minimum Production Cost created, under which you will find your configuration values with default values. You can change your default settings from here.

Have a happy time with Magento 😀 !!!

Create a magento module

Magento module

Modules are the core functioning unit in a Magento system. Here I am giving an overview of how to write a “Hello World” module in magento.

Simple basics before start you cooking 🙂

At the time of instantiating, magento system reads all the Xmls inside the folder /app/etc/modules/ to get the list of active modules and their corresponding code repository . So very first step of creating a magento module is to declare the module and its core repository(the repository of the module, in magento it’s calles codepool ).

If you open /app/code/ you will see 3 coodpool :- core, community and local.

app/
|–code/
| |—community/
| |—core/
| |—local/
|

The “core” cood pool is dedicated for magento’s all system modules. The “community” codepool is for all modules developed by magento’s partners and local is the codepool dedicated for you as a developer to write your own customized code.

In Magentos’ all modules are organized under a package. This package is nothing but a simple folder under codepool containing different modules. For example all core modules of magento system is kept unde package “Mage” (open the folder /app/code/code/ , you see the folder “Mage” under which all system module resides).

Before start cooking lets fixup the name of our module is Mymodule and our package name is Mypackage .

1.Declare your shell module and it’s code pool

Create a xml file /app/etc/modules/Mymodule.xml (You can use any name, even you can use a single file to declare number of modules).

   <?xml version="1.0"?>
   <config>
      <modules>
         <Mypackage_Mymodule>
            <active>true</active>
            <codePool>local</codePool>
         </Mypackage_Mymodule>
    </modules>
  </config>

2.Create the basic structure Under /app/code/core/local/ :-

Mypackage/
|–Mymodule/
| |–Block/
| |–controllers/
| |–etc/
| |–Helper/
| |–sql/
|

3.Write the front controller /controllers/IndexController.php

<?php

   class Mypackage_Mymodule_IndexController extends Mage_Core_Controller_Front_Action
   {
      public function indexAction()
      {

         //Do nothing fo the time being

         $this->loadLayout();
         $this->_initLayoutMessages('customer/session');
         $this->renderLayout();
      }
   }

4.Create design layout for our controller action
/app/design/frontend/default/default/layout/mymodule.xml

   <?xml version="1.0"?>
   <layout version="0.1.0">
      <default>
      </default>
      <mymodule_index_index>

         <remove name="right"/>
         <remove name="left"/>

         <reference name="root">
            <action method="setTemplate"><template>page/1column.phtml</template></action>
         </reference>

         <reference name="content">
            <block type="mymodule/helloworld" name="helloworld" template="mymodule/helloworld.phtml"/>
         </reference>
      </mymodule_index_index>
   </layout>

4.Create associated block
/Block/Helloworld.php

<?php
   class Mypackage_Mymodule_Block_Helloworld extends Mage_Core_Block_Template
   {
      public function getHelloWorldMsg()
      {
         return "Hello world";
      }
   }
&#91;/sourcecode&#93;
<h3>5.Create Helper for this module
<em>/Helper/Data.php</em></h3>


<?php

   class Mypackage_Mymodule_Helper_Data extends Mage_Core_Helper_Abstract
   {

   }

&#91;/sourcecode&#93;
<h3>6.Now organize every thing write the settings for this module in
<em>/etc/config.xml</em></h3>
We declare the following things in out config.xml

i) Version number of the module. Magento keep track to version number in "core_resource" table which is used to run sql_setup[Details discussed in another post] .

ii) Router information for this module. It contains frontanme and access privilege (front end controller or admin ).

iii) Which layout xml to use for its design.

iv) Global path for module , blocks and helper .

v) Default connection to use for db read &amp; write.


<?xml version="1.0"?>
   <config>
      <!-- i.Version Number -->
      <modules>
         <Mypackage_Mymodule>
            <version>0.1.0</version>
         </Mypackage_Mymodule>
      </modules>
      <!-- ii. Router information -->
      <frontend>
         <routers>
            <mymodule>
                 <!-- Means front end controller -->
                  <use>standard</use>
                  <!-- Fron name "Myfrontname" declared for "Mypackage_Mymodule" -->
                  <args>
                     <module>Mypackage_Mymodule</module>
                     <frontName>myfrontname</frontName>
                  </args>
            </mymodule>
         </routers>
         <!-- iii. Desing layout file -->
         <layout>
            <updates>
               <mymodule>
                  <file>mymodule.xml</file>
               </mymodule>
            </updates>
         </layout>
      </frontend>

      <global>
         <!-- iv. Global path for model, blocks, helper -->
         <!-- models reside under path "Mypackage/Mymodule/model/" -->
         <models>
            <mymodule>
               <class>Mypackage_Mymodule_Model</class>
            </mymodule>
         </models>
         <!-- blocks reside under path "Mypackage/Mymodule/Blocks/" -->
         <blocks>
            <mymodule>
               <class>Mypackage_Mymodule_Block</class>
            </mymodule>
         </blocks>
         <!-- Helper reside under path "Mypackage/Mymodule/Helper/" -->
         <helpers>
            <mymodule>
               <class>Mypackage_Mymodule_Helper</class>
            </mymodule>
         </helpers>
         <!-- v. Declaring db connections -->
         <!-- Also sql setup handler declared in this portion -->
         <resources>
            <mymodule_write>
               <connection>
                  <use>core_write</use>
               </connection>
            </mymodule_write>

            <mymodule_read>
               <connection>
                  <use>core_read</use>
               </connection>
            </mymodule_read>
         </resources>

      </global>
   </config>

That’s it. Go to http://yourdomain.come/magentopath/myfrontname/ and see your first magento modules output 🙂

Force customer login

I had a requirement like customer support will able to login as any customer. Here is the code snippet i used to force customer support to login as normal user.

  $customerId = (int) $this->getRequest()->getParam('id');
  $customer   = Mage::getModel('customer/customer')
                    ->load($customerId);

  $userSession = Mage::getSingleton('customer/session');
  $userSession->setCustomer($customer);
  Mage::dispatchEvent('customer_login', array('customer'=>$customer));

  $this->getResponse()->setRedirect(Mage::getUrl('customer/account'));

what is magento sql/setup?

While you are writing a new module or customizing existing ones’ you may need to do some tweaking in your db. Magento gives you facility to write sql insaltaller/updater which will run exactly once in its lifetime , do the tweaking for you need and then instantiate you module. In case of complete new module you have to write installer sql and in case of customizing module updater sql.

How does module installer works ?

At the time of instantiating magento looks all Xml files inside the forder /app/etc/module/ to get primiry information about it’s all active module. Then for each module it read the module’s etc/config.xml for is there any sql setup handler available or not. If any sql setup handler declared in config.xml, it looks for the current version number of the module in db core_resource table. The core_resource table contains list of setup handler’s and their corresponding version number.

If no sql handler is listed in the core_resource table then magento runs the installer, if version number in config.xml is greater then the version number in the core_resource table, magento runs the proper updater sql file. For example core_resource table version number is 0.1.0 and in your config.xml you give version number 0.2.0, then magento run the mysql4-upgrade-0.1.0-0.2.0.php.

Writing installer/updater php

Writing an installer/updater is very simple. Get the installer instance, startup installation, run the desired query , and then stop the setup process. For you better understanding I am giving a simple example :-

i)Declare you module and its code pool in
/app/etc/modules/mymodulename.xml

<?xml version="1.0"?>
<config>
  <modules>
    <Mypackagename_Mymodulename>
      <active>true</active>
        <codePool>local</codePool>
    </Mypackagename_Mymodulename>
  </modules>
</config>

ii)Define the setup handler in
/app/code/local/Mypackagename/Mymodulename/etc/config.xml

<?xml version="1.0"?>
<config>

  <modules>
    <Mypackagename_Mymodulename>
      <version>0.1.0</version>
    </Mypackagename_Mymodulename>
  </modules>

  <global>
    <resources>

      <!-- Declaring module setup handler -->
      <!-- &#91;start&#93; -->
      <mymodulename_setup>
        <setup>
          <module>Mypackagename_Mymodulename</module>
        </setup>
        <connection>
          <use>core_setup</use>
        </connection>
      </mymodulename_setup>
      <!-- &#91;End&#93; -->

      <mymodulename_write>
        <connection>
          <use>core_write</use>
        </connection>
      </mymodulename_write>

      <mymodulename_read>
        <connection>
          <use>core_read</use>
        </connection>
      </mymodulename_read>

    </resources>
  </global>
</config>

iii)Write the installer php
Mymodulename/sql/mymodulename_setup/mysql4-install-0.1.0.php

<?php

  $installer = $this;

  $installer->startSetup();

  $installer->run("

    DROP TABLE IF EXISTS {$this->getTable('securityquestion')};

    CREATE TABLE {$this->getTable('securityquestion')} (
      `securityquestion_id` int(11) unsigned NOT NULL auto_increment,
      `title` varchar(255) NOT NULL default '',
      `status` smallint(6) NOT NULL default '0',
      `created_time` datetime NULL,
      `update_time` datetime NULL,
      PRIMARY KEY (`securityquestion_id`)
    ) ENGINE=InnoDB DEFAULT CHARSET=utf8;

    INSERT INTO {$this->getTable('securityquestion')}(
    `securityquestion_id` ,
    `title` ,
    `status`
    )
    VALUES ('1', 'Mother\'s maiden name', '1') ,
    ('2', 'Father\'s middle name', '1') ,
    ('3', 'My first car', '1') ,
    ('4', 'High School name', '1');

  ");

  $installer->endSetup();

Ok, we are done !!! Please leave your comments here 🙂 .

Sending Email in Magento

Couple of days back I had to work with mail sending in magento e-commerce. Here I am giving a complete example of how to do that:-

Magento sends mails with it’s model “core/email_template”. Here is an example code for your understanding:-

/**
  * $templateId can be set to numeric or string type value.
  * You can use Id of transactional emails (found in
  * "System->Trasactional Emails"). But better practice is
  * to create a config for this and use xml path to fetch
  * email template info (whatever from file/db).
  */
  const EMAIL_TEMPLATE_XML_PATH = 'customer/testemail/email_template';
  $templateId = Mage::getStoreConfig(EMAIL_TEMPLATE_XML_PATH);

  $mailSubject = 'HI this is a test mail.';

  /**
  * $sender can be of type string or array. You can set identity of
  * diffrent Store emails (like 'support', 'sales', etc.) found
  * in "System->Configuration->General->Store Email Addresses"
  */
  $sender = Array('name'  => 'S. M. Asad Rahman',
                  'email' => 'asad.dk.bd@gmail.com');

  /**
  * In case of multiple recipient use array here.
  */
  $email = 'smasadrahman@yahoo.com';

  /**
  * If $name = null, then magento will parse the email id
  * and use the base part as name.
  */
  $name = 'Asad Rahman';

  $vars = Array();
  /* An example how you can pass magento objects and normal variables*/
  /*
  $vars = Array('customer'=>$customer,
                'address' =>$address,
                'varification_data'=>'fake data for example');*/

  /*This is optional*/
  $storeId = Mage::app()->getStore()->getId(); 

  $translate  = Mage::getSingleton('core/translate');
  Mage::getModel('core/email_template')
      ->setTemplateSubject($mailSubject)
      ->sendTransactional($templateId, $sender, $email, $name, $vars, $storeId);
  $translate->setTranslateInline(true);

Now lets put email template information in config.xml of the corresponding module.

<?xml version="1.0"?>
<config>
<!-- Other config infos 
goes here
 .
 .
 .-->
   <global>
    <!-- Other config infos 
    goes here
    .
    .
    .-->
    <template>
      <email>
        <customer_testemail_email_template translate="label" module="mymodulename">
          <label>Test email sending</label>
          <file>test_email_template.html</file>
          <type>html</type>
          </customer_testemail_email_template>
        </email>
      </template> 
    </global>
 </config>

This config xml says there is a email template in “app/locale/en_US/template/email” there is a email template named “test_email_template.html”, so lets create the template file:-

<div style="font:11px/1.35em Verdana, Arial, Helvetica, sans-serif;">
  <table cellspacing="0" cellpadding="0" border="0" width="98%" style="margin-top:10px; font:11px/1.35em Verdana, Arial, Helvetica, sans-serif; margin-bottom:10px;">
    <tr>
      <td align="center" valign="top">
        <!-- &#91; header starts here&#93; -->
          <table cellspacing="0" cellpadding="0" border="0" width="650">
            <tr>
              <td valign="top">
                <p>
                  <a href="{{store url=""}}" style="color:#1E7EC8;"><img src="{{skin url="images/logo_email.gif" _area='frontend'}}" alt="Magento" border="0"/></a>
                </p>
              </td>
            </tr>
          </table>

          <!-- &#91; middle starts here&#93; -->
          <table cellspacing="0" cellpadding="0" border="0" width="650">
            <tr>
              <td valign="top">
                <p>
                <strong>Dear {{var customer.name}}</strong>,<br/>
                This is a test mail.:-)
                </p>
              </td>
            </tr>
          </table>

      </td>
    </tr>
  </table>
</div>

In config.xml we set values for “customer_testemail_email_template”, but in code we use Mage::getStoreConfig(“customer/testemail_email/template”) to set $templateId. So we need to create a relation in between two. To do so we will create a installer to insert a data in db config.

<?php

$installer = $this;
/* @var $installer Mage_Core_Model_Resource_Setup */

$configValuesMap = array(
  'customer/testemail_email/template' =>
  'customer_testemail_email_template',
);

foreach ($configValuesMap as $configPath=>$configValue) {
    $installer->setConfigData($configPath, $configValue);
}

That’s it. Now this code snippet is good enough to send a customized mail. If you want the facility to set email template from admin panel, use the following system.xml in your module.

<?xml version="1.0"?>
<config>
  <sections>
    <customer>
      <groups>
        <testemail translate="label">
          <label>Apply Non-Profit Account Options</label>
          <sort_order>100</sort_order>
          <show_in_default>1</show_in_default>
          <show_in_website>1</show_in_website>
          <show_in_store>1</show_in_store>
          <fields>
            <email_template translate="label">
              <label>Email Template</label>
              <frontend_type>select</frontend_type>
              <source_model>adminhtml/system_config_source_email_template</source_model>
              <sort_order>3</sort_order>
              <show_in_default>1</show_in_default>
              <show_in_website>1</show_in_website>
              <show_in_store>1</show_in_store>
            </email_template>
          </fields>
        </testemail>
      </groups>
    </customer>
  </sections>
</config>

That’s it !!! I hope this post will help you sending emails from magento. Please leave comments 🙂 .